![]() Are you installing scripts for analytics, pixels, conversion tracking etc on your website? Or are you using Google Tag Manager?
Are you installing scripts for analytics, pixels, conversion tracking etc on your website? Or are you using Google Tag Manager?
If the answer is NO, it should be YES!
Google Tag Manager (GTM) is an awesome and essential tool.
In this article, we outline what Google Tag Manager is, how to set it up and how to take advantage of it.
Warning: it’s a little complex to set up but can be extremely valuable. If you don’t have the technical skill, you may have to call in the geeks!!
What is Google Tag Manager?
You’ll often need to collect information or track activity on your website. For example, you might want to use Google Analytics to track details of visitors to your website or track visitors so you can target them with Facebook ads.
The normal procedure for this is to get a piece of tracking code and copy it to every page of your website that you want to track.
This starts to get messy as you add more and more code to your website and there are also some potential issues (e.g. it takes time for your website to load these tracking codes).
Google Tag Manager simplifies this (plus there’s lots more functionality too!).
With GTM, you just need to add the code onto your website and then on you go, to Google Tag Manager itself, to add any further tracking code/scripts.
What are the advantages of GTM?
- Faster – When you open up a web page, everything loads at once. With GTM, scripts load up asynchronously and it’s faster.
- Less hassle – Do you have to open up source code to add your scripts? Or worse, you have to email your developer?! Now, you can go into Tag Manager and do it yourself.
- More flexibility – GTM is a powerful tool so there’s a lot more flexibility.
- Testing – When you create your scripts, you can test them out with a debug mode so you will break your website less often.
- Version control – There’s a new version number every time you publish and you can easily track changes.
- Script management – You can assign permissions to different team members so some, for example, can view the tags but not add or change them.
How do you install the Tag Manager?
You start off by creating an account. You can just use your company name.
Every account has one or more containers. This is just a way of grouping similar stuff together. If you have one website, you’ll just have one container.

You’ll get a piece of code that you need to add to your website. Once it has been installed, you won’t need to add any more code to the website again.
What terminology do you need to be familiar with?
- Container – This is your bucket for holding all configuration related to your website.
- Tag – You create a tag to add the code you are using to measure traffic, visitor behavior etc.
- Trigger – This is how you define when an event happens. For example, you could say that a tag is ‘fired’ when a certain page on your website loads. When you create a tag you can create the trigger at the same time.
- Variables – This is where you specify something like ‘page url’ instead of specifying the actual URL. I’ll show you an example later of the benefits of this.
Example of Setting up a Tag
The first tag you’ll probably set up is for Google Analytics. When you set up a tag, you’ll see that there are some templates already defined for popular tools (e.g. Google Analytics and AdWords).
Enter the name of the tag and then click on Google Analytics. If a template is not available, you need to enter the code you got from the vendor (select custom HTML tag or custom HTML image).

After this, you’ll a screen similar to the following:

In this, you specify:
a) The type of analytics you are using – standard or universal.
b) Configure tag – This is where you enter your Google Analytics tracking code. You get this from Google when you set up your Analytics account.
c) Track type – What do you want to track with this code? For this, we want to track page views.
d) Advanced settings – You can get fancy with more settings. For example, you could specify the priority of this tag if there are other tags on the page.
e) Fire on – You specify when this tag fires. It could fire every time a page loads, when someone clicks on a button on a page, when someone submits a form etc.
When you have finished with this configuration, you select ‘create tag’.
But…
…at this stage, the tag is not operational. You need to publish the changes before it’s operational. See the next section.
When you have created some tags, this is what is looks like:
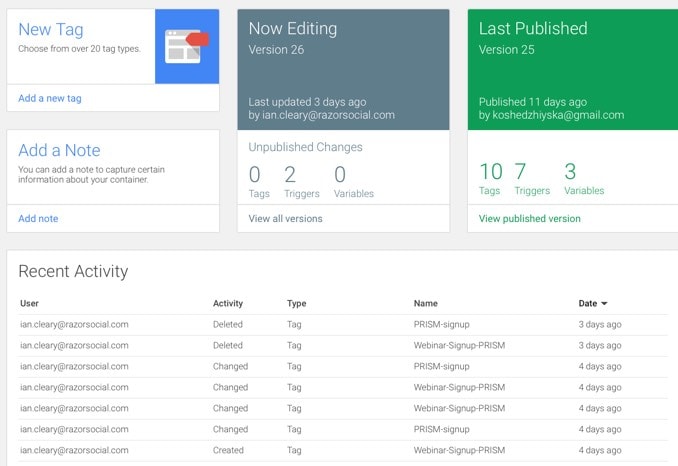
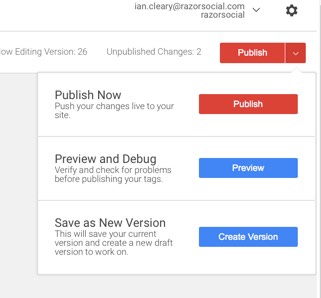
How to Publish and Debug your Tags
Your tag is not operational until you hit the publish button but, before you do that, you should click ‘preview’. You can then open up your website in debug mode and see if the tags are firing correctly.
This is what your site will look like with debug mode on:

In the above, you see that three scripts have loaded.
- ConversionFly – This is a conversion tracking tool.
- Facebook Pixel – This tracks visitors on your website so you could track Facebook ads.
- Ontraport Tracking Script – This is an automation tool that needs to track activity from subscribers.
Previously, I loaded a new tag and ran debug mode and there were errors in the script. If I copied this directly to the website, it could have broken the website. This debug mode is handy!
Administration
In the administration section of GTM there are various useful pieces of functionality, for example:
User management – You can give permission to users to access an account and/or container. For example, they could have view, edit, publish and delete access for a container within an account (but not for another container)
Import/export container – You may have container configured from another account that you want to import to save you setting up all the tags again.
Note: The administration section is where you get access to your GTM code.
Useful Resources
- How to set up event tracking (e.g. you want to track people clicking on buttons on your website
- Simo Ahava gives more advanced technical details of GTM
- GTM set up and installation
- Using Variables within GTM
- Popcorn metrics – Use this if GTM is too difficult for you to set up event tracking.
Summary
Google Tag Manager is a powerful and useful tool and, if you have a website, you need to use it!
Once you have it set up, you’ll be glad you have it.
Have you used GTM? Tell us what you think of it!