 WARNING: If you are not monitoring Google Webmaster Tools, this is damaging to your business!
Do you know how essential it is to have it installed?
When Google crawls through your site, it produces a report and gives it to you for free. This report helps you find out what Google likes and doesn’t like about your website.
Wouldn’t you like to know this information?
In this guide we go step-by-step through all you need to know about Google Webmaster Tools.
Why should you register your website with Google ?
Here are five good reasons:
1. It shows you which keywords are driving traffic to your website. Imagine if you saw that you were getting 1,000 visitors from a particular set of keywords and you had no blog post based on that set of keywords. In this case, you could write a blog post specifically on those keywords and get a ton more traffic.
2. Imagine if Google took a look at your site and found that there were lots of dodgy links coming in to your site, wouldn’t you like to know that it has identified a problem?
3. When Google is indexing your site, it checks out your meta title (a one-line description of your page) and your meta description (a more detailed description). If Google finds that you have duplicates then it’s harder to index the content correctly. Wouldn’t you like to know if this is the case?
4. Every site should have a sitemap, which describes all the content on your site and tells Google how often to index it. If Google has problems with this sitemap, wouldn’t you like to know about it?
5. Is your content strategy working? If you are writing great content, the amount of your content that appears in search results should be going up all the time. Wouldn’t you like to know this?
How do you install Google Webmaster Tools?
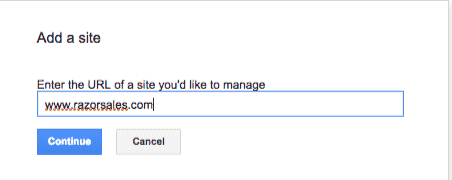
You will need to set up a Google account, which you probably have already. Once you have an account, go to to the Google Webmaster Tools set-up page and click ‘add site’.
You will need to verify that you are the owner of the site. Google gives you a few options to prove that you own your website:
a) Wherever you have registered your domain, you can add some information to the configuration that shows you that you own the domain.
b) Upload a HTML file.
c) Link it to your Google Analytics account.
d) Add some information to your home page.
e) Link it to your Google Tag Manager account.
Once your site is ready, you are up and running.
So, let’s step through all the sections of GWT Interface.
Site Dashboard
The site dashboard gives you an initial overview of the health of your website. This is a summary and, when we go through the menu items, you can see that more details are provided for each section.
It contains three sections:
Current status
This is the first image you’ll see on the list when you open Google Webmaster Tools. You immediately want to see three green ticks:
DNS – When Google looks up your site, it needs to connect with a DNS (domain name server), which tells Google where to go to find your website. If you see any errors on the DNS, that may be because Google has a problem accessing your DNS server. It could be that it can’t connect with it at all or that there is a delay. Either way, if you don’t see a green light, then you need to contact your hosting provider.
Server connectivity – If Google gets past your DNS but can’t then connect with your server, that’s another issue. You don’t want your site to be down and you don’t want a super-slow website. Get on to your hosting company, upgrade your hosting or move to another hosting provider if this happens regularly.
Robots.txt fetch – Normally, every site has a robots.txt file. This gives Google some instructions on what to index and not index on your site. It should also have information for Google about your sitemap (see later explanation). It’s not essential that you have one but it is advisable.
For example, here are two typical lines in a robots.txt:
- Disallow: /wp-includes/ – This means don’t index anything in this directory
- Sitemap: https://razorsocial.com/post-sitemap.xml – Here is the sitemap, i.e. you’re telling Google where it is.
So, it’s important that Google can access it correctly. There could be areas of your website you don’t want indexing at all, and there could be one or more sitemaps you want to tell Google about.
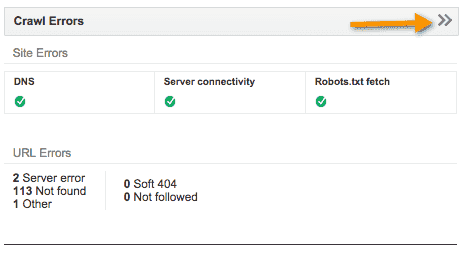
Underneath this, you will see any errors that Google Webmaster Tools has found. There are generally some errors displayed here and some are not of concern, but you do need to investigate them. Here’s an explanation of each section:
- Server error – If Google can’t access any URLs, you’ll see an error here.
- Not found – This means that your server returned a 404 error, which means the page is not there any more.
- Soft – A 404 error is returned when a page is not found – instead, you could assign a ‘200’ error and, instead of this page, send the home page to the person browsing. However, Google does not like this so it’s not recommended.
- Not followed – This is where Google can access your page but can’t read your content. This is an issue for your developer to resolve.
- Other – If Google finds other issues that don’t fit into the categories above, they will list them here.
‘Not found’ errors
This is where you will generally have some issues listed, but a lot of the ‘not found’ errors could be valid. Here are some things to consider:
- Deleted pages – You may have created a page and then deleted it when you were finished with it. If Google hasn’t updated the index yet, it will still attempt to access that page and return an error. This should correct itself.
- Pages that shouldn’t be indexed – Maybe there’s a page that Google has indexed when it shouldn’t have. You need to check your sitemap to see if it’s in there, and you may need to update your robots.txt to make sure Google doesn’t have access to the directory where the page is.
- The page is gone – Maybe it’s a genuine problem where the page has been removed accidentally, in which case it’s time to retrieve the file from your backups.
- Linking to something invalid – Google finds a page and then follows links on that page. If your links are broken then that’s an issue. One thing you should definitely do on a regular basis is check and fix any broken links. The best tool for doing this is Broken Link Check, which will tell you which links are broken. If people click on links that go nowhere that creates a poor user experience, so it’s good to do this check on a regular basis.
Note: 404s don’t affect your site’s rankings but it’s still good to clean them up.
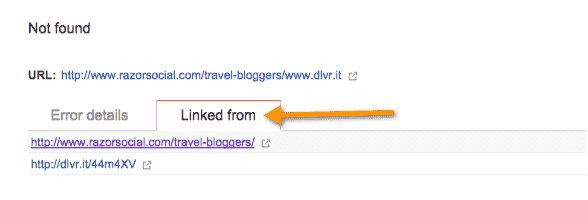
You can also go through each broken link, one by one, in Google Webmaster Tools. You click on the broken link, select the ‘Linked from’ section, and this will show you the page that links to the broken link.
Site Messages
This is where Google gives you information about any problems it finds on your site. Ideally you don’t want to see anything in this section. But you could see messages related to:
a) Your site has been hacked
If Google thinks your site was hacked, you’ll see a warning. The first thing you need to do is talk to your development team and/or hosting team to do an analysis and resolve this as soon as possible. Google is not going to send you a lot of traffic (if any) if it thinks your site has been hacked.
b) Unnatural links pointing to your site
It’s bad if you link out to dodgy sites, but it’s also bad if you are getting links back to your site that look unnatural from Google’s point of view. Unnatural links could be a high volume of links from sites that Google has identified as spammy.
It’s important to be notified of these messages. Select the ‘preferences’ option at the top right of your screen and make sure notifications are switched on.

Under the ‘type’ section, you can specify whether you want to notified of all messages, or just the top issues.
Search Appearance
The default screen displayed is the dashboard screen that we explained earlier on in this document. This shows three sections – crawl errors, search queries and sitemaps.
There are also some additional menu options:
Structured Data
Structured data is adding additional information to your web page to describe what is on it. You use a specific format, available on Schema.org, or you can use Microdata, RDF or Microformats. They all do pretty much the same thing.
Why would you use structured data?
Here’s an example:
I searched for ladies’ shoes on Google. I don’t normally search for ladies’ shoes, but I thought it would be a good example!
You can see that there are star ratings added to this listing. This makes the listing stand out on Google and, with a high rating, the click-through rate will be higher. This is microdata.
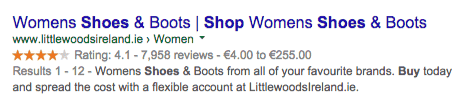
This section tells you if you have any errors with your microdata that need correcting.
Data Highlighter
After reading the previous section, you may be thinking that structured data is a bit complicated. It is, but not for a developer. However, the data highlighter is functionality that is provided by Google to make it easier to add structured data to your content.
This is how you do it:
Enter the web address of your site and specify what type of page it is. For example, it is a page all about book reviews.
In our example, we picked articles. When you use highlighter, you can decide if you want Google to tag just this page with the additional information, or if you want Google to tag all similar pages. This saves you performing the same process for hundreds or thousands of similar pages!

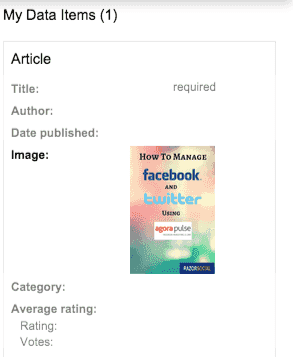
In the following example, I have highlighted the title of the post and then selected ‘Title’.

As you are highlighting sections you’ll see that, over on the right-hand side, Google displays what you are tagging. In this example, I highlighted the blog title and an image within the blog post.
Your best option for adding this structured data to your content is to code it within your pages (e.g. using Schema.org). Using the highlighter is not as good, because this is specific to Google only. If you don’t add the code then other search engines or products outside of Google will not see this structured data.
However, Google is probably your number one target and, if you can’t afford to get a developer to do it and you want it done quickly, this is a good way of doing it. For example, imagine you had a website with 1,000 pages and each page covered a product and had reviews of it. You might want to use the highlighter as a quick way of telling Google about the reviews.
HTML Improvements
This is a useful area because it displays any issues with your content that would affect your ranking, so resolving all issues is worth your while. Here are the sections it covers:
- Meta Descriptions – When you search Google, the first line you see in the search results is the ‘meta title’, and the next couple of lines are the ‘meta description’. It’s best to keep this content between 150 and 160 characters. If you have descriptions that are too long, they won’t be displayed by Google and, if they are too short, there may not be enough information for the browser to decide if the article is relevant to them or not. It’s also not good if the meta descriptions are exactly the same for two different articles. So, look at the errors provided by Google and resolve them!
- Meta titles – When Google is indexing your content, it looks at a tag called a title tag. Google will normally display 50 to 60 characters of a title tag; it’s not an exact number of letters because, if you have lots of narrow letters in your title, more characters will fit in the same space! As the title tags are used as part of Google’s indexing algorithm, you don’t want to mess with them. Make sure there are no duplicates, that they are the right length, that they are not too long etc.
- Non-indexable content – If Google finds content that it can’t index (and you didn’t specifically ask Google to not index it), you will see a list in this section.

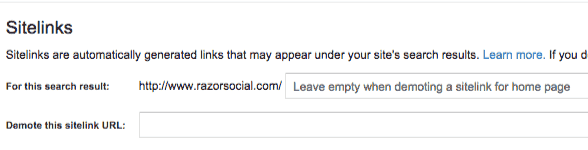
Sitelinks
If Google views your site as an authoritative site then, instead of just showing a one-line listing for your website, it will show some links to high-authority pages on your site. This is great, because your listing will appear a lot bigger so it will look more important and people will be able to click directly onto an article of interest.

You cannot ask Google to create sitelinks for you if they are not already displayed; Google makes that decision. You also cannot ask Google to add on a sitelink to a page you think is important. The only thing you can do is demote a link and remove it from the listing.
Search Traffic
This provides a wealth of information related to search on your site.
Search queries
You can view this in ‘top queries’ or ‘top pages’.
Top queries
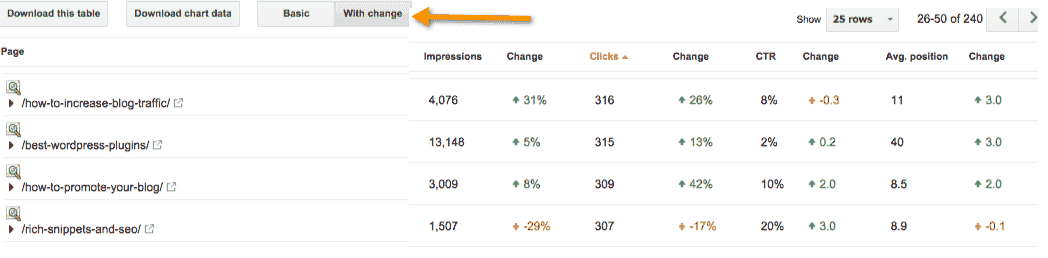
This shows you a list of the keywords that are driving you the most traffic. Here’s how it looks:

Here is an explanation of each of the columns:
- Query – The keywords used to find your site.
- Impressions – This is the number of times a web page on your site was displayed as a result of your keyword search. If someone searches, and you are on page 2 for that search, it is counted as an impression when someone goes to page 2.
- Clicks – This is the number of times someone clicks on your link in the search results.
- CTR – This is the click-through rate, which is the number of impressions divided by the number of clicks.
- Avg. Position – For an impression, what was the average position you appeared in search results?
What to do with this information
Here are some things to consider:
1. Are there any search queries that are not relevant to your site? Sometimes, you end up ranking for content that is not relevant at all to your business. Imagine if you had a website about gardening and you wrote a post about ‘Rihanna’s habits for gardening’. If you are ranking for ‘Rihanna’s habits’, that is not going to be relevant. It’s ok if there are a couple of keywords like this that don’t make sense, but you certainly don’t want a load of them.
You want Google to understand what your site is about. If you are ranking for invalid keywords, find out the offending page and start changing the content so you are more likely to rank for relevant keywords.
2. Is your click-through rate low for relevant content? Imagine if you had really good content that was found regularly but the click-through rate was low. To improve the click-through rate, you may update the title and description so it’s more relevant and also more enticing.
3. Are you ranking for keywords without any focussed articles for those keywords? You might find that you are ranking for keywords you never tried to rank for, and maybe your average position is on page 2 or further down. If you’re already getting traffic for keywords on page 2 and you haven’t targeted these keywords, it’s highly likely that you will get more traffic if you write an article really focussed on those words or phrases.
4. Are you getting clicks but your article is not appearing on page 1? If you have an article focussed on particular keyword terms and you’re getting traffic, but your average position is on page 2 or lower, then you may want to optimize this post further. This means reviewing and updating the content, building links from other pages on your site or building links from external authority sites.
Tip: If I had an article on ‘Facebook Contests’ and I wanted to find other articles on my site I could link to, I’d go to Google and type ‘Facebook contests site:razorsocial.flywheelsites.com’.
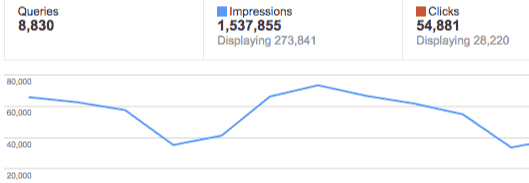
As part of the top pages, you can also view a graph of queries, impressions and clicks based on those impressions over a specific time period. Of course, ideally you want to see this going up all the time.
But the most important figure is clicks. Impressions are pointless unless people are clicking on your content.
Top Pages
Instead of viewing by top keywords, you can also view by top pages. There is an option here to view the different search results, clicks etc. for each page, based on the previous period. It is very useful to look at this.
In the example below, we have highlighted where we update this setting.
If you notice over on the left hand side of the image above you see a triangle symbol. Click on this and Google will show you all the search queries used to send traffic to that blog post. This is really interesting information!
Links to your site
This shows you the links from external sites to your site. You can drill down and pick pages on your website to view all the links from those pages. Here’s an example:
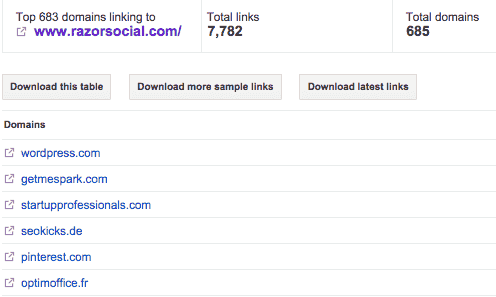
It’s useful, every so often, to do some link analysis. You can export all the links and view them in an Excel spreadsheet where you can do further analysis. One area to focus on is to identify who is linking to which blog posts, and also look at which posts get the most links. Why waste time on content that people aren’t linking to? If they are not linking to your content then it’s unlikely you will rank for the content.
You’ll probably find that the articles with the highest amount of links are the the long, detailed articles, infographics and group posts!
Although you can do some analysis here, my preferred tool is Ahrefs, which gives me more details related to the links e.g. the value of each link.
Internal Links
There are internal links where you are linking to content on your site. I don’t find this section particularly useful because menus appear on every page so it looks like your posts are linking to every menu item on every page. This means you are shown tons of links so it’s harder to find out which ones are relevant.
What is important is that you have an internal linking strategy to link relevant posts together.
As mentioned earlier, on a tip to find posts worth linking to, go to Google and type the keywords of the post you want to link to and then add your domain name using the ‘site’ command as follows:
“Facebook applications” site: razorsocial.flywheelsites.com
You’re looking for incidences of the term ‘Facebook applications’ being mentioned in any posts within razorsocial.com, these posts are relevant so it’s a good place to link to your post.
Remember, you can link old posts to new posts and new posts to old ones!
Manual Actions
When you arrive on this page, you want to see a nice message saying ‘no manual actions found’.
Manual actions are penalties imposed by Google on your site because they have found something on your site they don’t like. Manual actions can be site-wide matches that affect your whole site, or partial matches that affect parts of your site.
When you see that an action has been applied, you’ll see the reason for the action and how much of the site has been affected.
The types of manual actions could be:
- Unnatural links to and from your site – Make sure you remove these links. If external sites that Google doesn’t like are linking to you, reach out and ask them to remove the link.
- Hacked site – Get on to your hosting provider and/or development team to resolve this ASAP.
- User-generated spam – Spam content on your site. Get your development team to do an analysis and remove it.
- Content with little or no added value – Remove this content and start focussing on higher quality content. You might have thousands of pages with very little content on each page and it looks like you just created the pages to rank for the content.
- Pure spam – Get rid of any pure spam content.
- Spammy freehosts – A significant percentage of pages on your site are spammy, remove pages.
- Spammy structured markup – If you’ve added data to describe your content but Google thinks it looks spammy, you will either have to fix it or remove it.
- Hidden text or keyword stuffing – This was a bad practice years ago where extra content was added to rank for keywords. Remove this asap!
- Cloaking or sneaky redirects – You are showing different pages to Google than what you show to your website visitors. Change this asap!
When there are manual actions taken on your site and you resolve the issue, you can send in a request to Google to get the issue sorted. For example, if your site was hacked, once you resolve this Google will restore your previous listings.
International Targeting
There are two options here:
a) Language targeting
If you are targeting people in different countries, you will need to point people to a page with the relevant language. In this section, any language targeting will be displayed. Google will look at your website pages and try to find a line like this:
<link rel=”alternate” hreflang=”x” href=”alternateURL“>
This will tell Google if you are doing language targeting.
b) Country targeting
In Ireland, the domain extension is .ie, so if Razorsocial was focussed only on Ireland, we would be razorsocial.ie. That is a country-specific extension and Google automatically assumes you are targeting Irish visitors.
But, if you have a non-country-specific domain like .com or .org, you should tell Google which the most important country for you for ranking is.

Google Index
This gives you information related to the indexing of content by Google.
Index Status
This will show you the number of pages on your website that are indexed by Google, as well as the ones that are blocked from being indexed.
Ideally, you want to see the graph going up as you write more content. Google never indexes 100% of your content but you’re looking for a number that is very close to the total number of pages on your site.
If you go to the advanced section, you can also see the total number of pages that have been blocked.

Robots.txt is a text file that is normally found at the root of your website (e.g. razorsocial.flywheelsites.com/go). In this file, you give Google bots (software that comes to your website to index it) specific restrictions and information about what to index and what not to index. There may be a membership site you don’t want indexed, specific parts of your WordPress install, privates web pages etc.
If you think there are too many pages being blocked, you need to investigate your robots.txt to make sure it’s blocking the right content.
If you feel that not enough pages are being indexed, you need to start looking at your sitemap file to make sure you are telling Google to index all the right content.
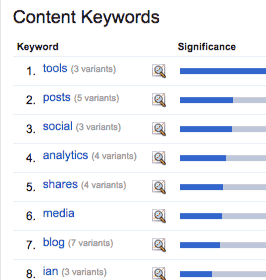
Content Keywords
This is where Google does an analysis of your website to see which words are appearing most frequently. You want to make sure that these keywords are relevant to your site. If you find that spammy keywords are appearing here, you can click on the keyword to find out which articles are using these spammy keywords and then you can remove them.
Remove URLs
If there is a URL that Google is indexing, you can submit a request for Google to remove that URL.
But be careful. Google specifically say that this should only be used in emergency situations where something like confidential information has been exposed. It clearly states that if you use this for other purposes it may affect your site.
So, don’t use it if it’s a page that is giving a 404 error (page not found), or just any page that shouldn’t be indexed but is not doing any harm.
Really, you should only use this in an absolute emergency. Here are Google guidelines -> Click here.
However, before you do this you need to try and get rid of it yourself: You can make sure your sitemap is rebuilt so that it’s not longer in the sitemap. If it’s a directory with only a few pages, you could block Google’s bot from indexing the content by adding a relevant line in the robots.txt file.
Crawl
Does it feel creepy that Google crawls through your website? It is creepy, but I welcome it!
Google sends out its bot to look for new content, but it’s friendly enough to tell if you if it finds any problems, which it breaks down by desktop, smartphone and feature phone.
In the list below, there are a few errors worth investigating and resolving.
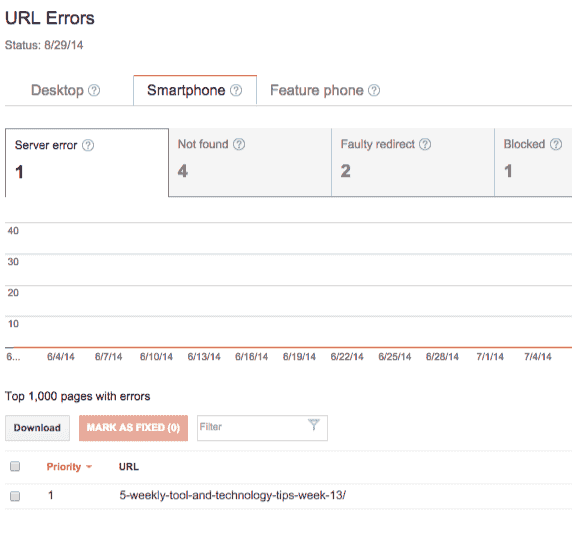
For example, the first error is a server error and this is related to a page not found. I clicked on the link and, on the page below, I can ‘fetch as Google’. The page was returned fine so I just marked it as fixed.

Crawl Stats
The crawl stats show you the number of pages that are crawled per day, the total content downloaded each day (to analyze for indexing) and the time spent crawling the pages.
Ideally, you want the number of pages crawled to be going up as you add more content. If it isn’t, then you need to start investigating this (clue: start with the sitemap).
If the time it takes to crawl your site is going up a lot, that’s a cause for concern. Google wants a fast website, so you need to make sure it’s not taking too much time for Google to download content.
For example, your server could be slow at certain times of day and this could be when Google is crawling it. This may mean you need to change servers.
Fetch as Google
This allows you to ‘fetch’ your content and see it as Google sees it. If Google has problems accessing your content then you will need to resolve this.
You can fetch it as code or fetch with it fully rendered (i.e. displayed fully, not in code).
Robots.txt Tester
If you want to see if any page is blocked when it shouldn’t be, in your robots.txt file, you can enter the web address to test it out.
Sitemaps
The sitemap is where you tell Google about all the content you have on your website and how frequently you want it to be indexed. There’s no point in getting Google to index content every day if it doesn’t change that often.
You will notice that you’ll never get everything you submit indexed, but if the number of submitted pages versus indexed pages is very close in number then you don’t have a lot to worry about.

If you don’t have a sitemap, there are various tools that will help you create one. For example, WordPress SEO by Yoast creates and updates the sitemaps required (and you can have multiple sitemaps for different areas of your site).
URL Parameters
Sometimes, you can have the same content on your website but it is tagged differently at the end of the page name. Google will normally figure out whether it’s the same content or not, but if it can’t work it out you may need to provide it with some help.
Be very careful with this section – you’re probably better avoiding it because it’s super techie!
Security Issues
If there are any security-related issues found by Google, they will be listed here. Obviously, you will need to resolve any security issues as soon as possible.
Summary
GWT is an extremely important item in your tool box. Google tells you of any issues it finds when it crawls your website, and because Google probably sends you the most traffic, you need to pay attention.
Have you installed Google Webmaster Tools yet?
Do you look at it regularly?
Will you install it after reading this post?
Thanks for reading!
Ian
Map image by Shutterstock