When was the last time you did an audit on your website analytics to make sure it’s set up correctly?
We run a lot of audits for companies (SEO, website, competitive analysis, etc.) and we have found that issues with analytics are very common.

Here are some of the typical issues that you should check for when performing a web analytics audit for your website.
1. Google Search Console not set up
When Google crawls through your website to index it, it will provide you with a report that can be found in Google Search Console.
It’s an essential report because it will give you insights into your site’s search traffic and performance and list any issues that Google found when indexing your pages.
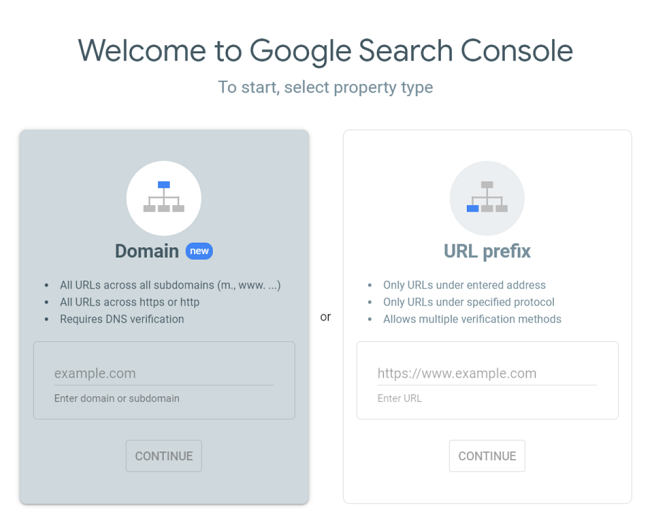
Google Search Console is easy to set up. The first thing you’ll need to do is sign up for GSC using your Google account and then add your website (Google calls this ‘property’).
You’ll have the option to choose whether you want to track your entire domain or just parts of it under a specific address.
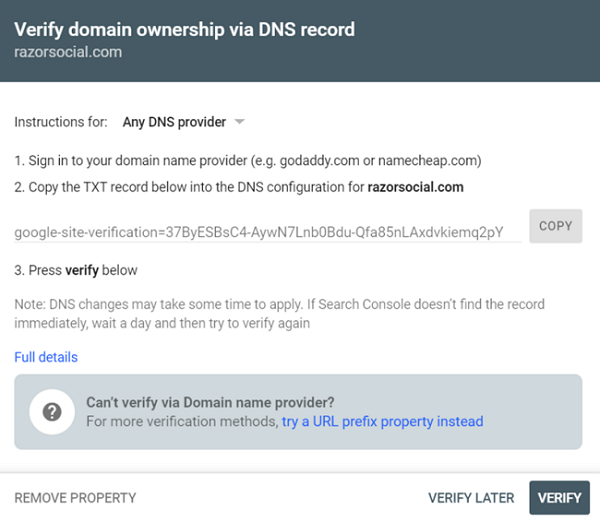
Next, you’ll need to prove that you are the owner of your website and the default option that Google Search Console offers is verification through your domain name provider.
As you can see from the screenshot below, this is a pretty straight forward process. You’ll select your DNS provider from the dropdown, sign in to your host, and copy the DNS TXT code into the DNS configuration for your site.
After that, you’ll just press ‘Verify’ and you should be all set up!
Now that you’ve verified your website, you should link Search Console to your Google Analytics account, enabling these two accounts to share data i.e. you’ll see Search Console data in your Analytics reports.
From your search console dashboard, click on the property name and select “Google Analytics property” from the dropdown, choose the appropriate property and press save.
2. Ownership of Website Analytics
When you set up Google Analytics, you’ll have the following structure: Account → Property → View.
Account – This is the overall account for your analytics.
Property – An account can have one or more properties. For example, if you had one website you’d have one account and one property. If you had 2 websites all belonging to the same company, you’d have 1 Account and 2 properties.
View – This a filtered view of the analytics data for a property. For example, you only want to see the Social Media activity report for your website.
Quite often if you are working with an Agency they will have their Account set up and for every website they manage they will add them as a property.
This means that you don’t own the account and if you decide to leave this Agency they may not give you access to your analytics.
So….
…mark sure you own the account!
If you are in a situation where the Agency owns the account you can get it transferred over to you.
What you need to do is set up a new Account and give the Agency temporary admin permission to it. Then you get the Agency to move the property over to the new Account.
Now you can remove their admin permission!!
When you had your analytics setup, who set up your account?
3. Not setting up Google Tag Manager
Google Tag Manager is an extremely useful tool because it provides a simple way to manage all the marketing and analytics tags that you have to add to your website.
Doing this without tag manager is a bit of a pain and you can easily lose track of the tags you added.
Here are some example tags that you may add to your site:
- Facebook tracking pixel
- Google Analytics tag
- Website tracking software e.g. heatmaps
If you do this manually, you’ll have to get a piece of tracking code and copy it to every page of your website that you want to track.
The better approach is setting up Google Tag Manager and just adding the Tag Manager code to your website.
Now that this is set up you can use Google Tag Manager for managing all this going forward.
But that’s only part of the reason. Using Google Tag Manager gives you the capability of doing a lot more advanced stuff with your analytics.
Check out our article for detailed instructions on how to set up and use Google Tag Manager.
4. Not setting up Goal tracking
When we work with companies on setting up website goals, we always advise them to write down some SMART goals first.
Specific
Measurable
Achievable
Realistic
Timebound
For example, ‘I want to increase inquiries from my corporate booking page from 10 to 15 by the end of 2020.’

When you have SMART goals it’s easier to track them in analytics.
You can then track how many inquiries came from that page.
But that’s not all….
…you can now track where these inquiries came from – international visitor, social media visitor etc.
There are 4 goal types in Google Analytics and here’s an overview of each:
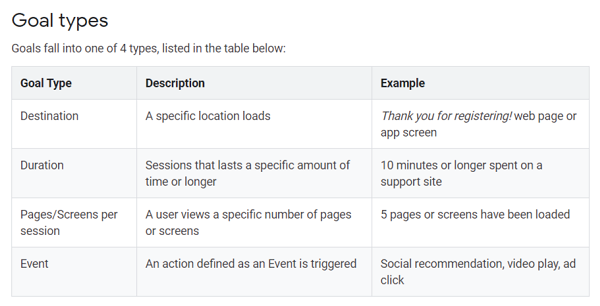
Our example goal is a Destination goal and you can learn how to set this and other types of goals in our article on GA goal setting.
There are also more advanced goals that you can set up, like Funnel goals and eCommerce goals.
Funnels are incredibly important if you want to be able to map out and track every step your customers take on their path to conversion.
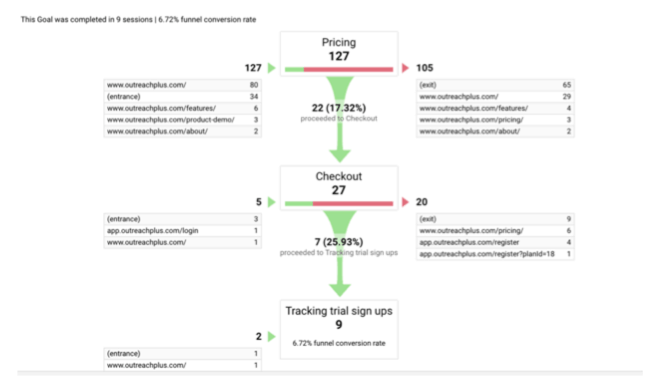
With a Destination goal, you can specify the path you expect your website visitors to take and this is called a funnel. When you specify steps in the funnel (each step is a website page with its own URL) you’ll be able to track conversion data at each step and see where in the conversion funnel visitors are dropping off.
If a big percentage of visitors are dropping off on a specific page, you should analyze this further to see what is driving the high exit rate for that step of the funnel.
You’ll see this data in your Goal Flow and Funnel reports and this is invaluable for optimizing your funnel and ultimately increasing conversion.
5. Excluding your IP Address
If possible, you’ll need to exclude your IP address so that it’s not tracked when you are visiting your website.
You don’t want to think you are generating lots of visitors when most of them are you! You can create a filter in Google Analytics to filter out traffic coming from your IP address.
Here’s how to do it:
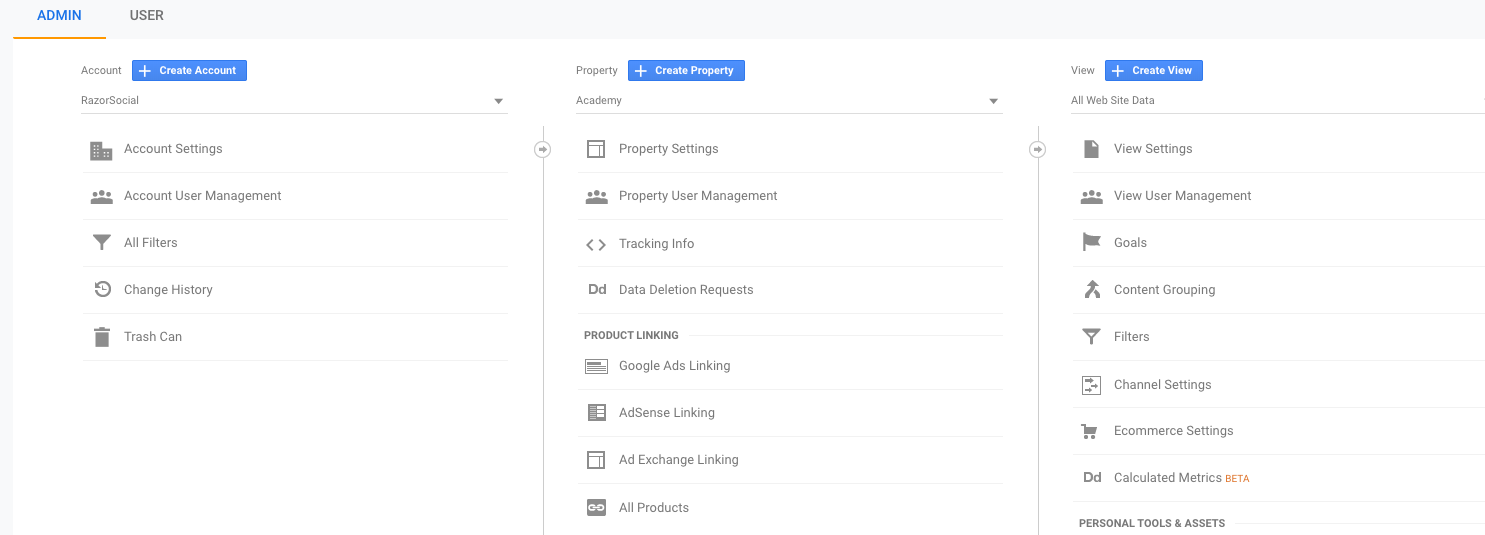
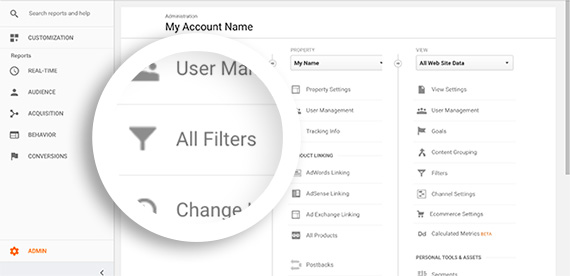
Log into your Google Analytics account and select “Admin” from the menu on the left-hand side of your screen. The Admin page is divided into three columns with settings for your Account in the leftmost column where you’ll click on ‘All Filters.’
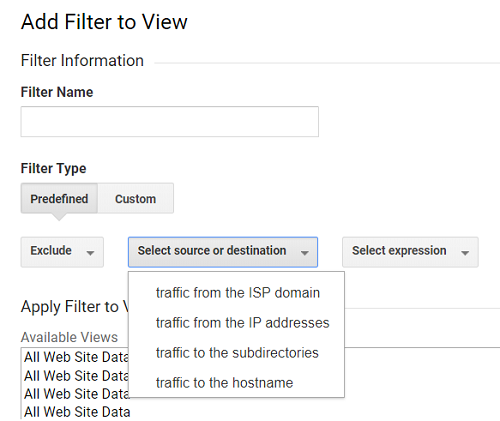
You’ll click on ‘add filter’ next and you’ll see a form you need to fill to create a filter. You’ll enter a name for the filter, leave the Filter Type as Predefined, select Exclude from the filter type drop down, and then go to Select source drop-down menu and select traffic from the IP addresses.
Then you just need to enter your IP address in the text field and click Save and you’re all done!
Note: A static IP address stays the same. A dynamic one changes all the time. If you have a dynamic IP address you won’t be able to exclude it. You can check your IP on sites like whatismyip.com, write it down, restart your router and then check it again. If it has changed, you have a dynamic external IP address.
6. Set up SPAM filters in GA
In our experience working with companies, too many websites do little or no data filtering in Google Analytics.
If you don’t set up filters, you’ll have all sorts of fake information mixed in with your real user data in GA reports. To avoid having a corrupted view of your traffic, you need to filter out spam. The first step is to locate the spam domains in your referral traffic report and you’ll find it under Acquisition → All Traffic → Referrals.
So, how do you know which of the referring domains is spam? Simply look at the bounce rate – if a domain has 100% bounce rate and 0:00:00 average session duration then you’re dealing with a spam domain! Make a list of all spam domains and head over to Admin → All Filters → Add filter (same as for filtering your IP address).
Next you’ll give your filter a name, select “Custom” filter type, and then enter the spam domains you want to filter out into the Filter Pattern text box.
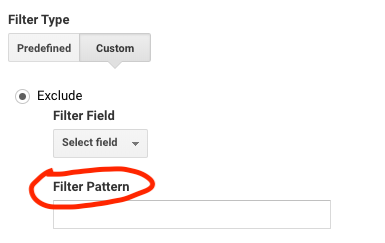
If you want to enter several domains, use the following formula:
domain\./domain\.
After you enter all spam domains you want to block, scroll down to the “Apply Filter to Views” and click “All Website Data” and click “save.”
That’s it! You’re now safe from spam domains and no longer have to worry about having an unrealistic view of your referral traffic data.
7. No backup view
No matter how good you are at managing your Google Analytics account, you need to have a backup view in place for your Master view.
By creating copies, your original view will remain exactly the same and act as reference point for data you’re collecting for that property, while you can add filters to duplicate views.
To copy a view, go to Admin and in the View column click on “View settings.” From there you’ll click on “Copy view,” then give a name to the duplicate view, and save it by clicking “Copy view.”
8. Not using UTM tags to track campaigns
If you share the same link on several social media platforms, email etc the only way to know which one of those platforms drove most traffic is by adding UTM tags to the URL. Without UTMs you’ll be in the dark and you won’t know how to attribute traffic to the appropriate campaign.
Fortunately, this is incredibly easy to do with the help of Google’s Campaign URL Builder. This online tool will let you add tags to the URL, making it easy for you to track the success of your campaigns in Google Analytics.
Here’s the short form that you’ll need to fill out:

After you share your tagged links, it will take Google a few days to gather the data. You’ll be able to track the performance of your campaigns in Google Analytics under Acquisition → Campaigns.
9. Not using free tools to help verify GA setup
We’ve already established that proper tracking is key to success of any marketing campaign. We talked about the importance of adding and managing tags with Tag Manager, but how do you check your tracking setups? How do you identify tracking errors?
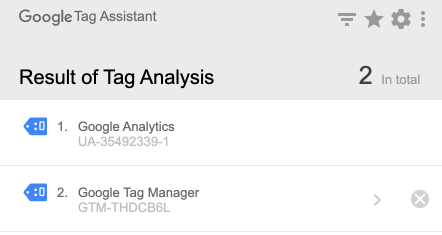
There’s a free Chrome extension from Google called Tag Assistant that you can use to check all your Google Analytics and Google Ads tags.
When you install the extension, you can go to any web page and click the Tag Assistant icon to see which tags are firing on the site. You’ll also see if tags were properly installed, or if there are any errors that need fixing.
10. Not using annotations
Let’s say you are running a campaign and you start seeing some serious spikes in traffic. In a year’s time, you won’t remember what caused this spike.
Unless…
…you add annotations to your traffic chart in Google Analytics!
When you look back at your reports, annotations will help you understand why there was a spike (or a sudden drop) in traffic on a certain day.
There are two ways to add annotations:
1. From your traffic/audience reports

2. From Admin screen → View Column → Annotations.
11. What about linking site search to GA?
Many companies that we did Web analytics audit for didn’t connect their Google Analytics account to their internal site search. And it’s mostly because they didn’t know how useful this is for understanding what people are searching for on their website, and how the search results drove further engagement.
Here’s how to set this up. Go to the “View” column in your Admin section in GA, click “View Settings,” and then set Site Search Tracking to ON.
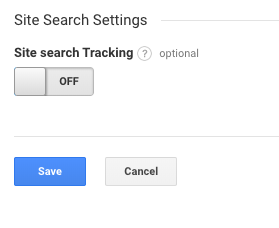
In the Query Parameter field that appears after you turn on site search tracking, enter up to 5 word(s) that designate internal query parameters and separate them with commas like this: ‘term,search,query,keywords.’

If your website enables users to search by category, you can turn this on so you can see that information in your GA reports. Optionally, you can also enter the category parameters you use on your site so Analytics can identify which search categories your users select the most.
Conclusion
A proper Google Analytics setup is essential if you want to have a complete insight into your traffic, user behavior, and user actions on your website.
By going to some common issues in GA setups, we showed you how to set up your Google Analytics configuration so that you get the best possible data and then use it to optimize your website for more traffic, engagement, and ultimately conversion.