 What captures your attention when you are reading someone else’s blog?
Images and video are great for breaking up lots of content and they add some color to your blog posts.
But what about adding some moving images and animations to your blog?
An animated GIF is a series of images put together to give the appearance of movement. An animated GIF can play automatically so it captures the attention of your user. They are really popular on the web in a variety of formats, and well-known sites like BuzzFeed are famous for their use of animated GIFs.
These animations can be very quick to create and they can also be really useful, for example, creating a short GIF to demonstrate a tool that you like using online.
We recently wrote a post on how to make an animated GIF for social media and it was so popular we have researched more tools for you.
Here are five animated GIF tools worth taking a look at if you want to create some mini animations for your website:
1. Create a Quick, Free Screenshot Animation with LICEcap
LICEcap is a free, downloadable tool that allows you to record actions that take place on your screen and save them as an animated GIF.
It is very simple but its results are impressive.
When you have downloaded the software and launch the tool, it can look quite confusing, because it just looks like an empty box.
But, in fact, this is the outline of the area of the screen that LICEcap is going to capture. This means you can resize the LICEcap capture box to make sure you are only recording the part of the screen you want.
The recording can be paused (by clicking ‘pause’ or by using the keyboard shortcut ctrl+alt+P) and the frames per second (FPS) can be chosen – a higher number will give a smoother gif, but the file size will increase and this could slow your website down.

2. Create a GIF from Photos for Free with Giffysnap

Giffysnap is a website where you can upload a series of image files and create an animated GIF from them. It is free to use and you don’t even need to register to use the service.
GIFs like this can be especially good to show transformations. Perhaps your real-life store has undergone renovations and you want to show before-and-after pictures, or you have updated your website design and want a GIF to scroll through screenshots showing the changes that have been made.
You can decide the order your images should appear in, how quickly they should scroll and what size the final GIF should be.
When the GIF has been created, you can download it to your computer or get code to paste it onto your site. There is a tiny logo on the bottom right-hand side of the final GIF, but this is a really quick-and-easy tool to use.
3. Optimize and Edit GIFs with Ezgif
LICEcap and Giffysnap are great tools for quickly creating animations for your blog posts or website. They do what they do very well but, if you are looking for more advanced features, Ezgif could help.
With Ezgif, you can edit the GIFs you have made in a range of ways. For example, you can:
- Resize the GIF
- Crop it
- Upload a video file and transform it into a GIF file
- Optimize a GIF by reducing the number of colors in a frame or omitting certain frames, which reduces file size
- Apply color filters
- Rotate or reverse the image
- Change the speed
- Add text to the GIF
- Convert GIF images back into individual frames so you can edit them one by one, change the order, or remove a frame.

For each of these features, you go to the Ezgif website and choose which functionality you want from the toolbar at the top of the page.
In this example, we will use the GIF speed changer functionality.
You start by uploading your GIF to the site or adding the direct link URL. At the top of the next page, you will see your GIF as it is. Select a new delay time and click ‘apply’, then scroll down to see the GIF at its new speed.
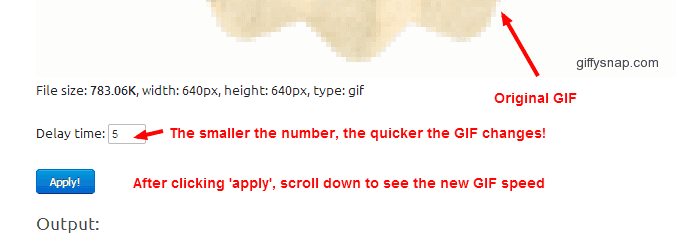
If you like what you see, right click the new GIF and save it to your computer. By changing the time delay on the GIF above to five, you can see how much more quickly it scrolls through the images:

4. Create Screenflow GIFs and Upload Them to the Web with Recordit
Recordit is downloadable software for Windows and Mac computers. Like LICEcap, it records the action that takes place on your computer screen but, instead of creating a GIF file on your computer, it uploads it to the Recordit.io website and creates a shareable link.
When Recordit has been installed on your computer, an icon appears in the bottom right of the taskbar. When you click this icon, horizontal and vertical lines appear that you drag across the screen to select the area of your screen you want to record.
When you have chosen the recording screen area, a ‘record’ button appears.
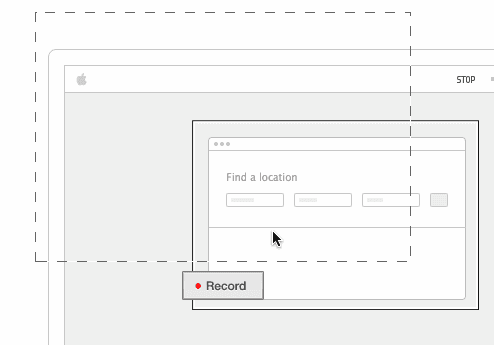
When you press ‘record’, Recordit then records everything that happens on your screen, within the scope of the box. The ‘record’ button turns into a ‘stop’ button, which you press when your recording is complete.
A few seconds later, a clickable screen pop-up takes you to your recording, hosted on the Recordit.io site. You can see an example of a GIF I made here. There are social sharing buttons in the top right-hand corner and, if you want to download your GIF to your computer, you can click ‘GIF’ below the recording, then right click and save the file.
5. Create and Share Animated GIFs on iOS devices with Gifit App
Gifit is a free app for iPhone and iPad devices with two main capabilities. The first one is its massive, searchable library of animated GIFs, which contains millions of GIFs in 40 categories. Handy for text messages and Twitter, this part of the app is particularly suited to reaction-style GIFs like ‘happy’ or ‘confused’.
The second capability is probably more useful for businesses and blogs. It allows users to create animated GIFs from images stored on their phone or tablet. This could be screenshots of mobile-optimized sites or photos you have taken at a conference or behind the scenes in your office, and the GIFs can be shared, linked to, or saved to your iOS device.
What’s next?
Do you use animated GIFs on your website? If so, what are your favorite tools? Tell us in the comments!